Дом > Новости > «Руководство BitLife: шаги, чтобы стать мозговым хирургом»

«Руководство BitLife: шаги, чтобы стать мозговым хирургом»

By ThomasMay 14,2025

Карьера является ключевым аспектом Bitlife CandyWriter, предоставляя игрокам возможность преследовать работу своей мечты, зарабатывая значительную внутриигровую валюту. Некоторые карьеры также помогают в достижении конкретных целей в еженедельных задачах. Среди самых прибыльных карьерных путей - это мозговой хирург.

Подобно карьере, такими как Morticic и Marine Biologe, стать хирургом мозга в Bitlife очень полезно. Это также важный шаг в Brains and Beauty Challenge и может быть выбрана для выполнения проблем, связанных с наукой. Это руководство проведет вас через шаги, чтобы стать хирургом мозга в BitLife .

Как стать хирургом мозга в BitLife

Карьерная карьера Bitlife Brain Hyrgeon

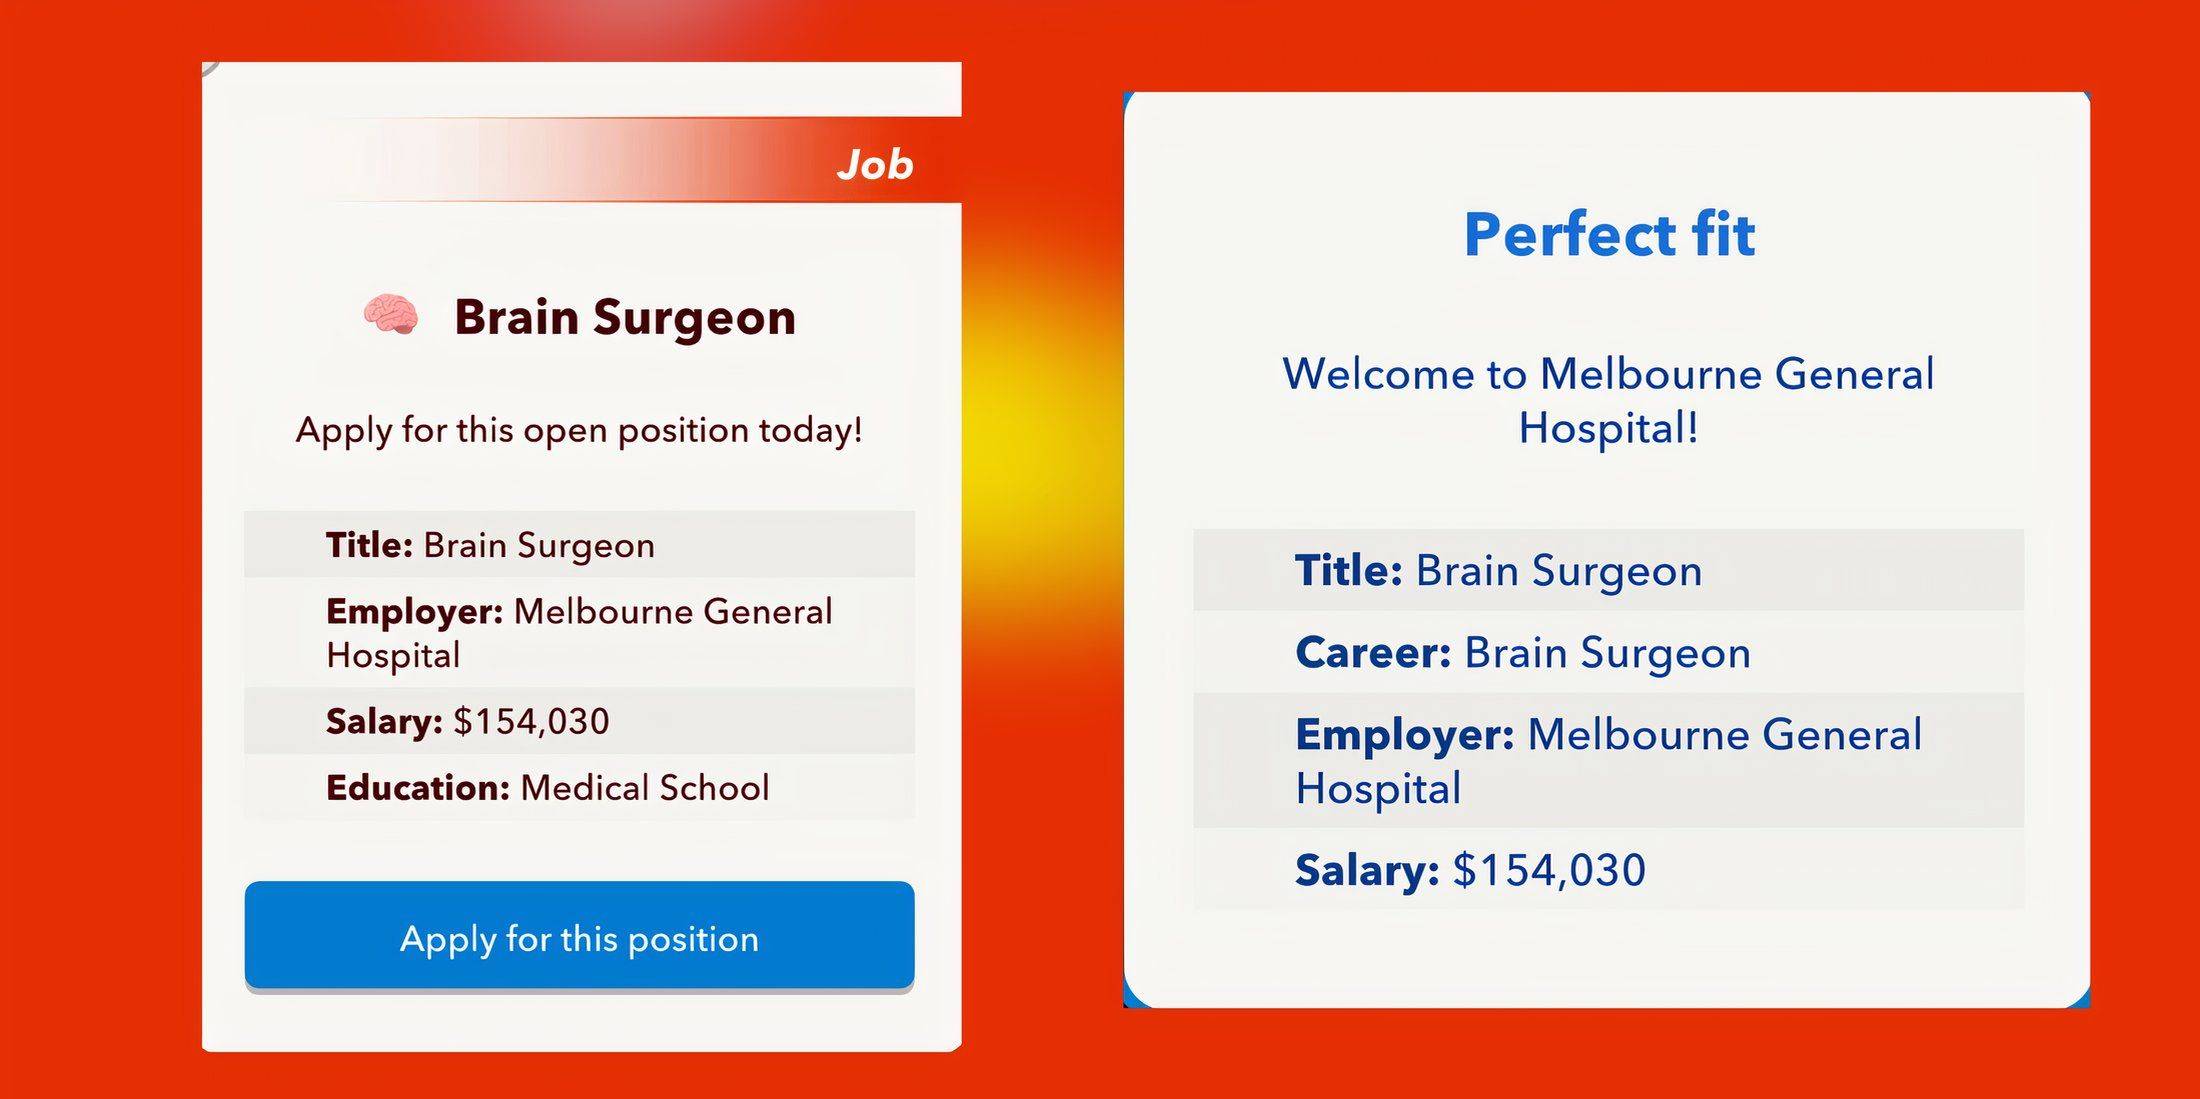
Чтобы отправиться в путешествие, чтобы стать хирургом мозга в Bitlife , вы должны сначала заполнить медицинскую школу, а затем занять должность хирурга мозга. Начните с создания нестандартной жизни, выбирая любое имя, пол и страну. Если вы пользователь премиум -класса, выбираете «академический», поскольку ваш специальный талант может дать вам преимущество. После того, как ваш персонаж будет настроен, возрастает, пока они не достигнут первичной или начальной школы, и сосредоточиться на поддержании отличных оценок. Превосходство в академическом порядке имеет решающее значение для продвижения к высшему образованию.

Чтобы повысить свои оценки, перейдите в «Школу», выберите свой институт и выберите вариант «Учебное заслугу». Кроме того, вы можете улучшить свою статистику Smarts, выбрав вариант «Boost» и просмотрев предложенное видео.

Продолжайте эту стратегию по мере продвижения в среднюю школу. Также важно поддерживать высокую статистику счастья, чтобы общий прогресс вашего персонажа не затруднялся.

После завершения средней школы вам будет предложено подать заявку на университет. Выберите психологию или биологию в качестве основного в разделе «Выберите свой основной». В течение ваших университетских лет продолжайте усердно учиться. После окончания учебы отправляйтесь на вкладку «Занятие», выберите образование и подайте заявку на медицинскую школу. Это последний шаг, прежде чем вы сможете осуществить свою мечту о том, чтобы стать хирургом мозга в BitLife .

Предыдущая статья:Construction Simulator 4: мастер-строитель с Expert советами Следующая статья:Dying Light: The Beast – 5 Tips for Surviving Castor Woods | IGN First As Dying Light: The Beast dives deeper into the dark heart of Castor Woods, players are thrust into one of the most dangerous and atmospheric zones yet in the Dying Light universe. With new biome hazards, aggressive enemies, and a relentless threat that stalks you at night, surviving here demands more than just parkour and melee combat. Here are five essential tips to help you stay alive and thrive in Castor Woods: 1. Master the Terrain – Use the Forest to Your Advantage Castor Woods is dense, overgrown, and full of verticality. Unlike the open cityscapes of Harran, here the trees, collapsed buildings, and tangled undergrowth offer natural cover — but they also obscure your vision and can hide enemies. Stay on high ground when possible. Use rooftops, old watchtowers, and wooden platforms to scout ahead. Avoid open clearings at night. The Beast and other creatures move faster and are more aggressive in open areas. Use the environment to ambush: Drop down from trees to surprise enemies, or set traps in narrow pathways. 2. Know the Beast’s Patterns – Hunt It, Don’t Run From It The Beast isn’t just a random threat — it follows predictable hunting patterns. Learn them to survive. The Beast only emerges at night. Stay in safe zones (marked by flares or barricaded buildings) during darkness. It tracks sound and movement. Avoid running, clattering metal, or loud gunfire at night. Use noise to your advantage: Lure it into traps or narrow alleys, then take it down using environmental hazards like gas tanks or collapsing structures. 3. Stock Up on Upgrades and Medic Castor Woods is harsher than any zone before — your gear won’t last long if you’re not prepared. Always carry at least 3–4 med kits and 10+ adrenaline syringes. You’ll need them for stamina recovery during chases. Upgrade your weapons early: Use scavenged materials to improve your melee and ranged weapons. Focus on firearms that deal high damage to large, armored enemies. Keep your backpack light but efficient. Prioritize healing items, flares, and throwable gadgets (like flashbangs and smoke bombs). 4. Use Flares and Light Strategically Light is both a blessing and a curse in Castor Woods. Flares keep you safe from the Beast — but they also attract it. Use flares only when you’re in a secure location (e.g., inside a bunker or under a reinforced structure). Avoid carrying flares at night unless you’re ready to fight. Instead, rely on your flashlight and sound-based stealth. 5. Exploit the Day-Night Cycle for Tactical Advantage The weather and time of day affect enemy behavior and visibility. Daytime is your best time to explore and scavenge. Most enemies are slower and less aggressive. Nighttime is for survival and strategy. Use darkness to hide, but stay alert — the Beast hunts with precision. Plan your missions: Complete objectives during the day, then hole up in fortified areas to survive the night. Final Word: Castor Woods isn’t just another zone — it’s a living, breathing predator. Respect its dangers, master its rhythms, and use every tool at your disposal. With patience, preparation, and cunning, you can not only survive… but dominate the Beast. "In the woods, you don’t outrun the dark. You learn to walk through it." — Dying Light: The Beast – IGN First Stay sharp. Stay silent. And above all — stay alive.