Дом > Новости > "Nier: Automata Iron Tipe Guide"

"Nier: Automata Iron Tipe Guide"

By NatalieMay 19,2025

Быстрые ссылки

В Nier: Automata каждое оружие может похвастаться широким потенциалом повреждений с каждым свингом. Обновление вашего оружия не только сужает этот диапазон, но и повышает выходной сигнал ущерба за качание, повышая вашу боевую эффективность.

Железная труба выделяется с его исключительно широким распространением урона, но также предлагает один из самых высоких потенциальных результатов урона в игре. Это азартная игра, но определенно стоит поиска и экспериментировать. Вот как вы можете получить его.

Как получить железную трубу в Nier: Automata

Чтобы приобрести железную трубу, вам нужно ловить рыбу в канализации. Самая доступная канализация находится рядом с лагерем сопротивления. Быстро поехать в лагерь, затем отправиться в путь и поднимись по правой пути к парку развлечений. Переплив небольшой разрыв, вы окажетесь под шоссе. Посмотрите вправо на открытый люк и спуститесь в канализацию.

Оказавшись внутрь, встаньте в воду и начните рыбачить, чтобы попробовать свою удачу в ловке железной трубы. Вы также можете накатиться в других мусорных товарах, которые могут быть проданы за дополнительные средства. В этом нет особого трюка; Это может занять всего несколько попыток или несколько минут. Поскольку он довольно темный, используйте свет вашего стручка, чтобы улучшить видимость и сделать процесс рыбалки более плавным.

В качестве альтернативы вы можете попробовать рыбалку в канализации по дороге в затопленный город.

Статистика железной трубы в Nier: Automata

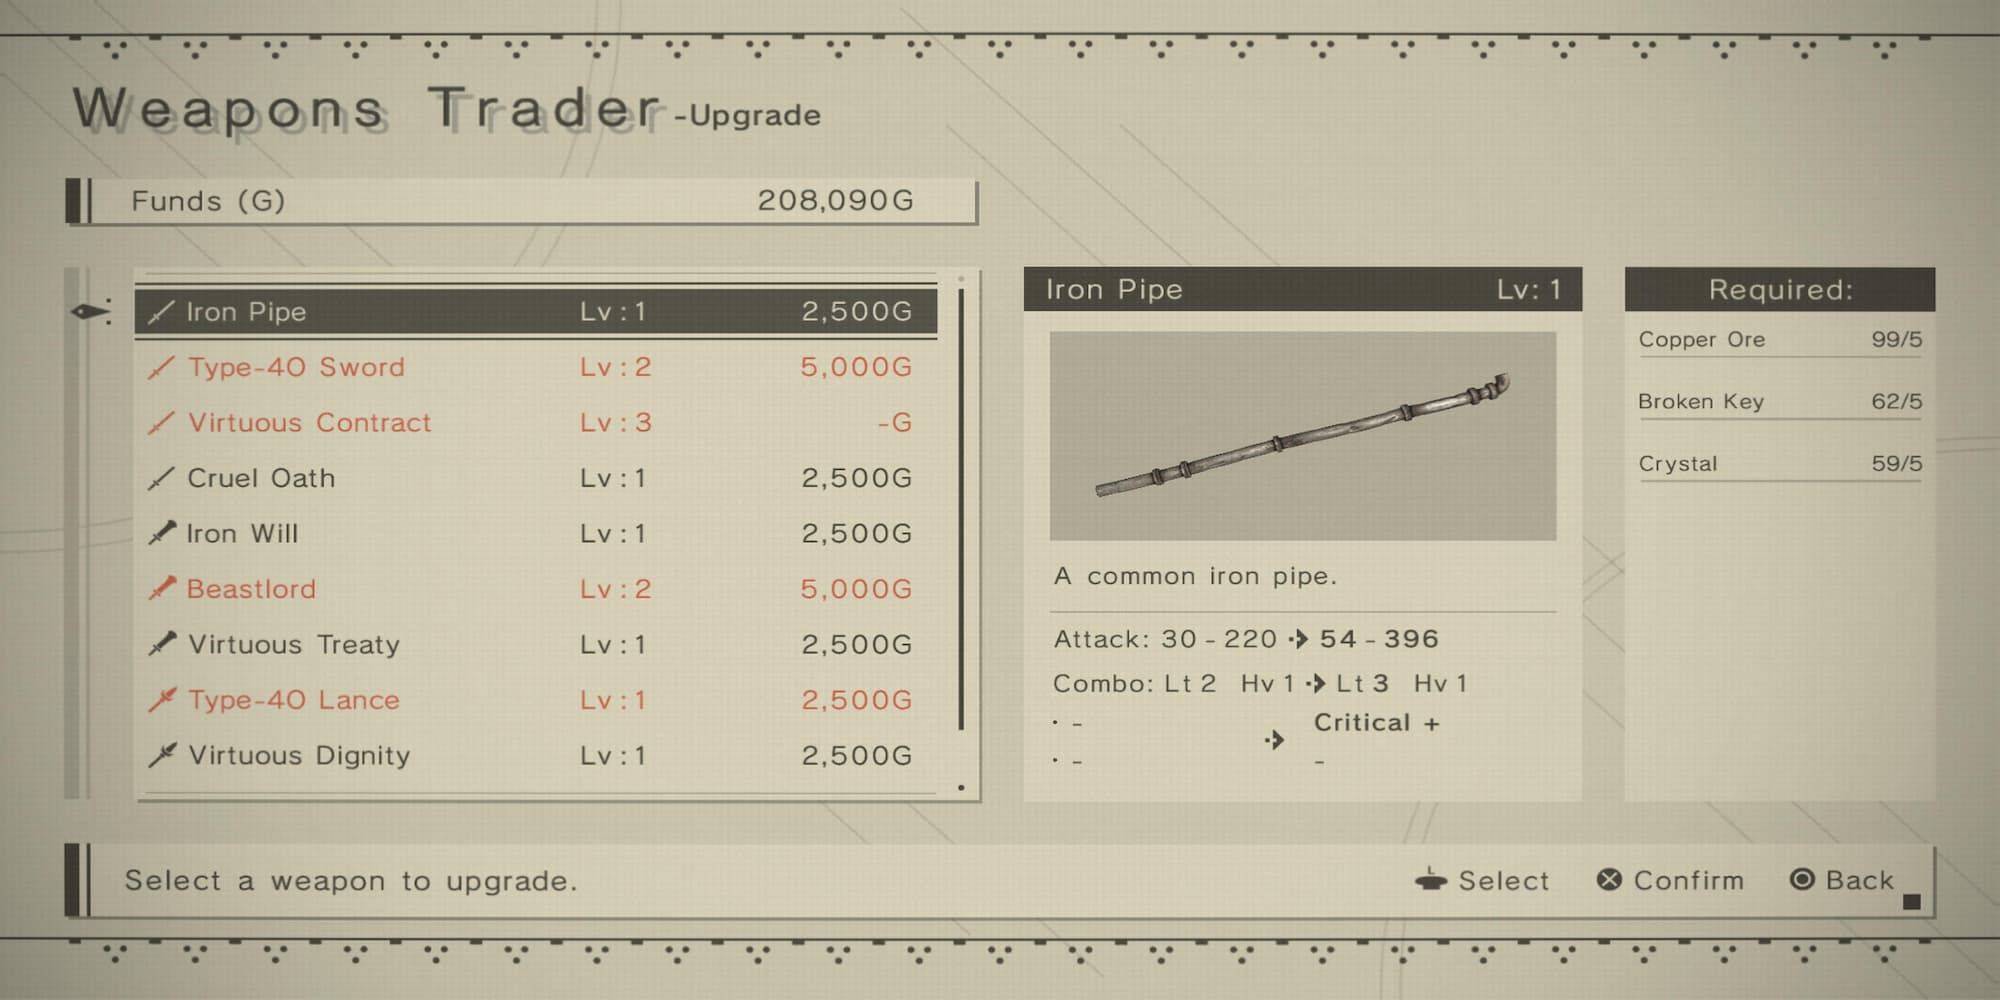
Диапазон повреждений железной трубы остается широким даже после обновлений. Тем не менее, если Fortune предпочитает вас, это оружие может доставить некоторые из самых высоких выходов в игре и можно получить в начале вашего путешествия. Ниже приведены требования об обновлении и полученные статистики:

Уровень Обновление требований Статистика
1 N/a Атака: 30-220
Комбо: LT 2 HV 1
2 Медная руда - 5
Сломанный ключ - 5
Кристалл - 5
Атака: 54-396
Комбоя: LT 3 HV 1
Критический +
3 Железная руда - 4
Серебряная руда - 3
Маленькая передача - 3
Янтарь - 2
Атака: 84-616
Комбоя: LT 4 HV 2
Критический +
4 Золотая руда - 2
Маленькая передача - 5
Большая передача - 3
Машиная рука - 2
Молдавит - 1
Атака: 114-836
Комбоя: LT 5 HV 2
Критический +
Высокий оглушитель
Предыдущая статья:Construction Simulator 4: мастер-строитель с Expert советами Следующая статья:Dying Light: The Beast – 5 Tips for Surviving Castor Woods | IGN First As Dying Light: The Beast dives deeper into the dark heart of Castor Woods, players are thrust into one of the most dangerous and atmospheric zones yet in the Dying Light universe. With new biome hazards, aggressive enemies, and a relentless threat that stalks you at night, surviving here demands more than just parkour and melee combat. Here are five essential tips to help you stay alive and thrive in Castor Woods: 1. Master the Terrain – Use the Forest to Your Advantage Castor Woods is dense, overgrown, and full of verticality. Unlike the open cityscapes of Harran, here the trees, collapsed buildings, and tangled undergrowth offer natural cover — but they also obscure your vision and can hide enemies. Stay on high ground when possible. Use rooftops, old watchtowers, and wooden platforms to scout ahead. Avoid open clearings at night. The Beast and other creatures move faster and are more aggressive in open areas. Use the environment to ambush: Drop down from trees to surprise enemies, or set traps in narrow pathways. 2. Know the Beast’s Patterns – Hunt It, Don’t Run From It The Beast isn’t just a random threat — it follows predictable hunting patterns. Learn them to survive. The Beast only emerges at night. Stay in safe zones (marked by flares or barricaded buildings) during darkness. It tracks sound and movement. Avoid running, clattering metal, or loud gunfire at night. Use noise to your advantage: Lure it into traps or narrow alleys, then take it down using environmental hazards like gas tanks or collapsing structures. 3. Stock Up on Upgrades and Medic Castor Woods is harsher than any zone before — your gear won’t last long if you’re not prepared. Always carry at least 3–4 med kits and 10+ adrenaline syringes. You’ll need them for stamina recovery during chases. Upgrade your weapons early: Use scavenged materials to improve your melee and ranged weapons. Focus on firearms that deal high damage to large, armored enemies. Keep your backpack light but efficient. Prioritize healing items, flares, and throwable gadgets (like flashbangs and smoke bombs). 4. Use Flares and Light Strategically Light is both a blessing and a curse in Castor Woods. Flares keep you safe from the Beast — but they also attract it. Use flares only when you’re in a secure location (e.g., inside a bunker or under a reinforced structure). Avoid carrying flares at night unless you’re ready to fight. Instead, rely on your flashlight and sound-based stealth. 5. Exploit the Day-Night Cycle for Tactical Advantage The weather and time of day affect enemy behavior and visibility. Daytime is your best time to explore and scavenge. Most enemies are slower and less aggressive. Nighttime is for survival and strategy. Use darkness to hide, but stay alert — the Beast hunts with precision. Plan your missions: Complete objectives during the day, then hole up in fortified areas to survive the night. Final Word: Castor Woods isn’t just another zone — it’s a living, breathing predator. Respect its dangers, master its rhythms, and use every tool at your disposal. With patience, preparation, and cunning, you can not only survive… but dominate the Beast. "In the woods, you don’t outrun the dark. You learn to walk through it." — Dying Light: The Beast – IGN First Stay sharp. Stay silent. And above all — stay alive.